network-manager only works with systemd

I still resist to systemd because initd just works great, i consider it mature enough and more secure, and i got a surprise when i wanted to keep initd with network-manager because it seems that network-manager now only works with systemd…. sad sad news.

But well, who knows, destiny calls.

Investigating a little i found another alternative network manager which looks pretty nice (for me), it is called wicd.

To add wicd to the fluxbox try:

vi ~/.fluxbox/startup

Add:

wicd-client -t &


Puppet agent: Exiting; no certificate found and waitforcert is disabled – Solution

After installing a brand new puppet master and client you may want to test the communication between them.  First you setup variable “server” in /etc/puppet/puppet.conf

Screenshot from 2017-09-21 16-19-34

You should have the puppetmaster or puppetserver up, in the same or other machine.  In this case i have setup a second independent server called “puppet01”.  If in doubt, you can test the connection to the default puppet port TCP 8140.

Screenshot from 2017-09-21 16-21-03

And it could happen that you get this error:

Screenshot from 2017-09-21 16-19-13

This happens because the puppet agent tries to reach the puppet master to receive the catalog which is later applied.  But this can happen if the master allows the certificate from the agent (client), the solution is to query the Puppet Server and see which certificates are pending to be approved:

puppet cert list

Screenshot from 2017-09-21 16-27-56

Your output may be slightly different, but the idea is the same.  If you want to allow this agent to get the catalog then you can accept this certificate.  Notice that the servername should be the same.

puppet cert sign <servername>
puppet cert sign puppet02.argentina

Or you could just accept all the certificates at once:

puppet cert sign --all

Screenshot from 2017-09-21 16-40-17


Installation script to add packages from Cran R

If you use the free software cran R to do data analysis and you are also that kind of person that likes to have the last version then you may be interested in this.  Many times i compile the last version of Cran R from scratch but have the problem that many packages are not automatically available for that version yet, the only solution is to download and compile them manually which is a lot of effort given all the dependencies.

I know that this is not a great solution, but it saved me a lot of time, it can be improved.

First you will need an index from the packages, you can create it so:

wget "https://cran.r-project.org/src/contrib/" -O pkgs.txt

And then you will have to run these lines a few times until all the dependencies are installed:

INSTALAR="ggplot2_2.2.1.tar.gz";
R CMD INSTALL ${INSTALAR} 2> /tmp/err
while [[ `cat /tmp/err | grep ERRO | wc -l` -ne 0 ]]; do
 i=`cat /tmp/err | grep "ERROR" | sed 's/.*dependenc[a-z]\{1,4\} //g' | sed 's/’ [are |is ].*//g' | sed 's/[,’‘]//g' | cut -f1 -d" "`;
 echo "Installing dependency $i";
 PP=`cat pkgs.txt | grep "^${i}_"`;
 if [ ! -e $PP ]; then wget "https://cran.r-project.org/src/contrib/$PP" -O $PP; fi;
 echo "Installing ${PP}";
 R CMD INSTALL ${PP} 2> /tmp/err;
done

If you want to install the “ggplot2” package, just put the package name in the variable “INSTALAR” and run the script.


Basic windows 7 exploitation analysis

As a System Administrator i realized that we can move through different specializations even it is not our primary role, that is interesting because one can never say that is bored!

I have seen many tutorials about exploit analysis, more about linux and less about windows but all of them very good.  I have studied this subject for a long time but only now i will share some words which may probably have been already said, but i hope this post helps somebody to understand with another example.  In the other hand, i share how i did things (which compiled i used, debugger)  there are many ways to do the same and that is not teached in books.

  1. Get a Windows 7 Professional.
  2. Get a ansi c compiler: Dev-Cpp but can also be Visual Studio 2017.
  3. A debugger (Ollydbg or Immunity).

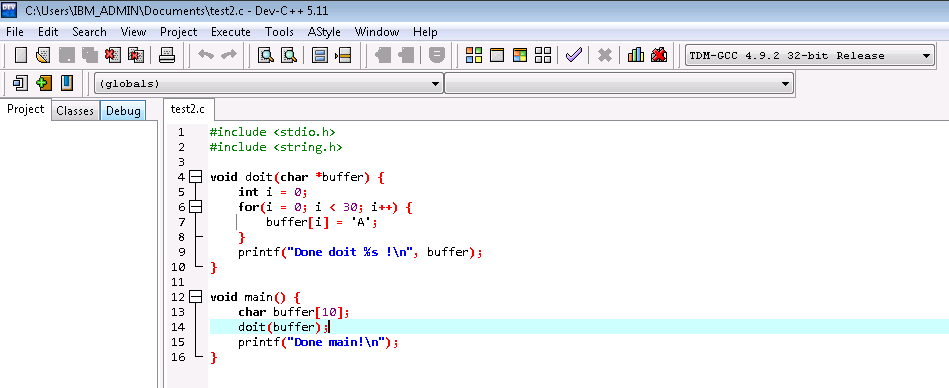
Create a vulnerable program in C:

Screenshot from 2017-08-10 14-55-59

This is the source, you can copy and paste it:

#include <stdio.h>
#include <string.h>
void doit(char *buffer) {
 int i = 0;
 for(i = 0; i < 30; i++) {
 buffer[i] = 'A';
 }
 printf("Done doit %s !\n", buffer);
}
void main() {
 char buffer[10];
 doit(buffer);
 printf("Done main!\n");
}

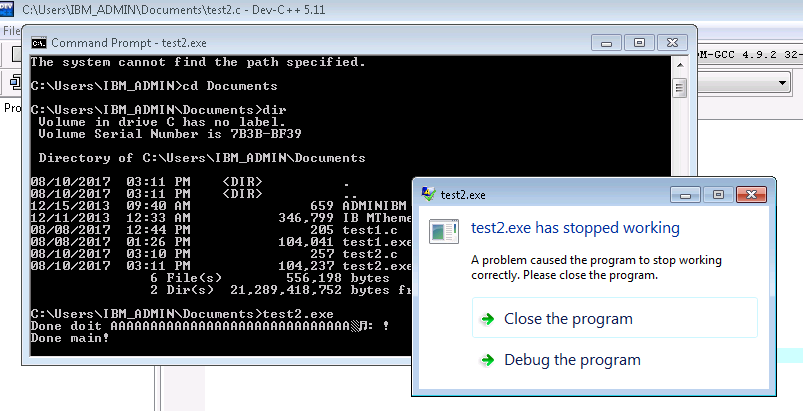
Now if you compile and test it the program will crash:

Screenshot from 2017-08-10 14-58-51

Lets debug the program and see how this bug can be exploited:

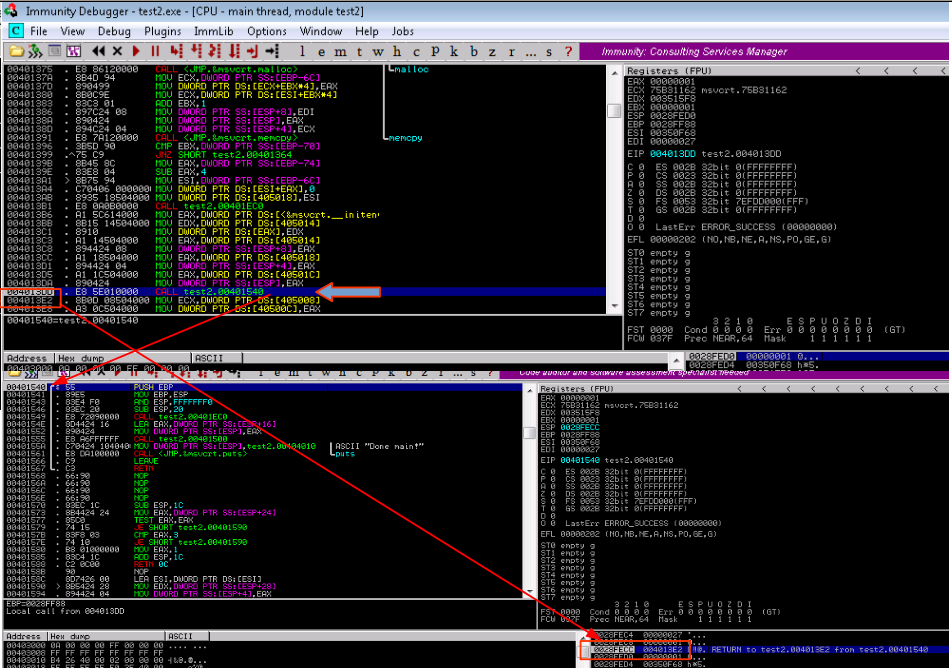
Open the test2.exe file with the debugger of your choice, i will show the examples with Immunity Debugger.  Then step forwared with F8, the .exe will do some initial stuff:

Screenshot from 2017-08-10 15-16-23

The debugged program is displayed in Assembler.  When a function is called in Assm, this is done with the “CALL” instruction, when a Call instruction is executed then the Next line of the code (the next one after the function call) will be stored in the Stack.  This is done so the program can keep from the point where it left, when the function call finishes its work.  This step in particular is done automatically, i guess it is done by the CPU but i am not sure.

When a function is called, the Stack is used to store:

  1. Internal buffers and variables
  2. Saved EBP
  3. The return address

Our stack looks like this in this moment:

Screenshot from 2017-08-10 15-30-14

Then this function doit() is called:

Screenshot from 2017-08-10 15-36-36

Again, the “call” instruction automatically stores the Return Address and the Stack looks like this:

Screenshot from 2017-08-10 15-45-10

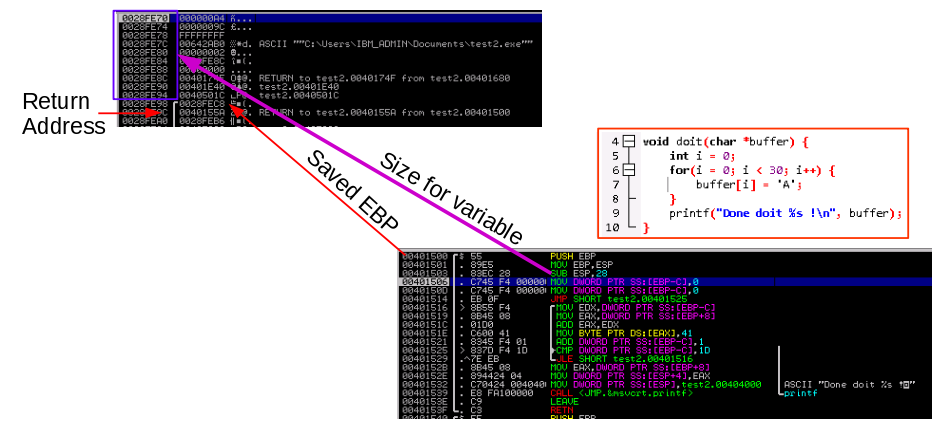
As told before, the function saves the Return Address into the STACK, then it saves the EBP (Base Pointer) and space for the variables.  Look that the Stack is a FIFO (First In First Out) Stack.

Screenshot from 2017-08-10 15-58-47

In this function, 30 characters ‘A’ (0x41 in hex) are stored into a variable of size 10, this causes the out of bounds overwrite.  Look the previous picture, where the return address was located in SP:28FECC now it says 41414141 (these are the ‘A’s) and this will cause the program to try to jump to that address and an error.

Screenshot from 2017-08-10 16-01-53

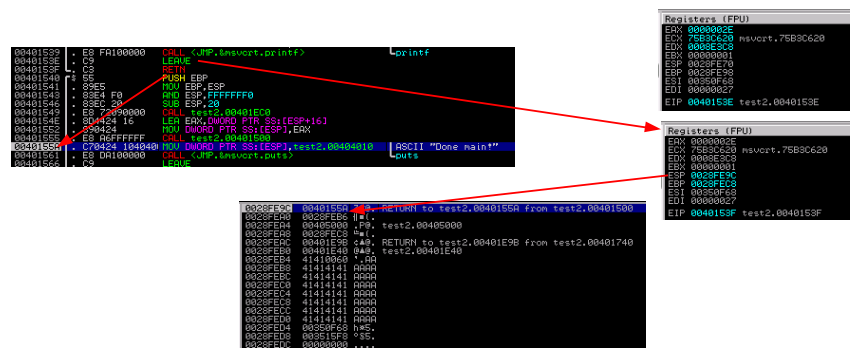
But not so fast, when the function ends, the “LEAVE” instruction is executed and the control of the program returns to the place it came from (Stack Pointer: 28FE9C) this is done by the RET instruction that takes the address in the SS:SP (Stack Segment:Stack Pointer) and continues there.  In this case it is 0040155A.

Screenshot from 2017-08-10 16-11-33

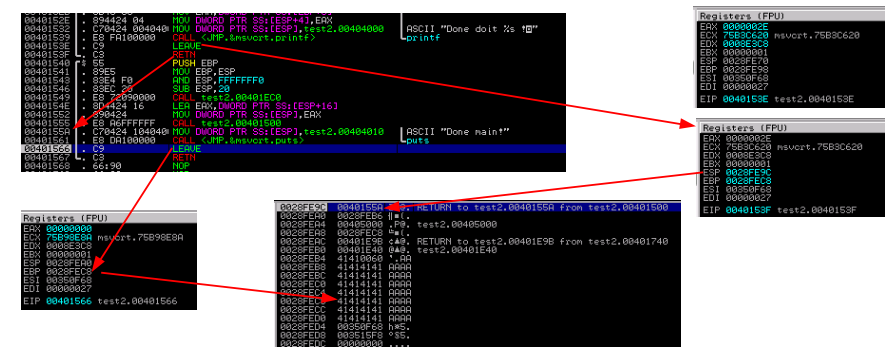
Finally, once in the Instruction Pointer 0040155A the instructions are a LEAVE and finally a RETN.  The LEAVE at 00401566 expects a return address at 0028FEC8 but there we wrote illegally a lot of ‘A’ (0x41 hex) which will exploit the program.

Screenshot from 2017-08-10 16-17-04

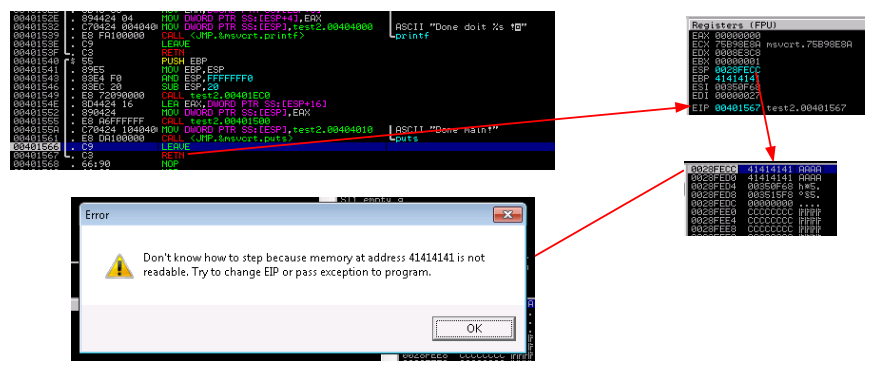
Like before, the RET instruction says “where should i go now ?”  It knows that the address should be in SS:SP but our SS:SP is contaminated with noice…. so occurs a Stack Based Buffer overflow.

Compiling CRAN R from scratch (and possible workarounds)

Download the CRAN R source here.

Just compile it:

cd R-3.4.0/
./configure
make

Now the possible workarounds:

Problem #1
configure: error: No F77 compiler found
Solution: apt-get install gfortran
Problem #2
configure: error: C++ preprocessor "/lib/cpp" fails sanity check
apt-get install g++
Problem #3
configure: error: --with-readline=yes (default) and headers/libs are not available
apt-get install libreadline-dev
Problem #4
configure: error: --with-x=yes (default) and X11 headers/libs are not available
apt-get install xorg-dev
Problem #5
checking whether bzip2 support suffices... configure: error: bzip2 library and headers are required
apt-get install libbz2-dev
Problem #6
configure: error: "liblzma library and headers are required"
apt-get install liblzma-dev
Problem #7
checking whether PCRE support suffices... configure: error: pcre >= 8.10 library and headers are required
apt-get install libpcre++-dev
Problem #8
configure: error: libcurl >= 7.22.0 library and headers are required with support for https
apt-get install libcurl-dev
Problem #9
make[4]: *** No rule to make target '/usr/include/pango-1.0/pango/pango.h', needed by 'devX11.o'. Stop
apt-get install libpango1.0-dev
Problem #10 - Obtain jdk from the Oracle Website
*** Please make sure 'java' is on your PATH or set JAVA_HOME correspondingly
export JAVA_HOME="/opt/java/jre/"
export PATH=$PATH:$JAVA_HOME/bin


Deploying an application in shinyapps.io

Once you have tested the application locally, you can deploy it to shinyapps.io.

library(rsconnect)
> rsconnect::setAccountInfo(name='twilightzone',
 +   token='A257B319BB30EC2A77556E2062387E43',
 +   secret='<secret>')
deployApp('/home/walter/github/viz1/shiny3')

And then you can access the application through a browser.

Installing R Shiny on Linux

After opening and making free some data i wanted to visualize it with R Shiny.  But i had to manage with some errors, here i share the errors and how i fixed them. First, i need the rsconnect package, but i get this error message:

package ‘rsconnect’ is not available (for R version 3.1.1)

So i will do it from scratch:

wget https://cran.r-project.org/src/contrib/RCurl_1.95-4.8.tar.gz
wget https://cran.r-project.org/src/contrib/rsconnect_0.8.tar.gz
wget https://cran.r-project.org/src/contrib/PKI_0.1-3.tar.gz
wget https://cran.r-project.org/src/contrib/base64enc_0.1-3.tar.gz
wget https://cran.r-project.org/src/contrib/RCurl_1.95-4.8.tar.gz
wget https://cran.r-project.org/src/contrib/bitops_1.0-6.tar.gz
wget https://cran.r-project.org/src/contrib/RJSONIO_1.3-0.tar.gz
wget https://cran.r-project.org/src/contrib/yaml_2.1.14.tar.gz
wget https://cran.r-project.org/src/contrib/rstudioapi_0.6.tar.gz

Installing the packages:

R CMD INSTALL RCurl_1.95-4.8.tar.gz
R CMD INSTALL base64enc_0.1-3.tar.gz
R CMD INSTALL PKI_0.1-3.tar.gz
R CMD INSTALL bitops_1.0-6.tar.gz
R CMD INSTALL RJSONIO_1.3-0.tar.gz
R CMD INSTALL packrat_0.4.8-1.tar.gz
R CMD INSTALL yaml_2.1.14.tar.gz 
R CMD INSTALL rstudioapi_0.6.tar.gz
R CMD INSTALL rsconnect_0.8.tar.gz

Here you may get this error:

pki.h:11:25: fatal error: openssl/err.h: No such file or directory
 #include <openssl/err.h>

Solution:

apt-get install libssl-dev


Methods used to identify your anonymous browsing

Sorry for the bad news.  Anonymous browsing is not real, it is just a lie so you are honest at browsing and do online believing your identity is being protected.

In this post i will show some results from the project created by the Electronic Frontier Foundation called Panopticlick.

Screenshot from 2017-04-30 17:55:08

  1. Do not believe in what your eyes see.  This option creates a false sense of security, nothing worse.

Screenshot from 2017-04-30 18:00:02

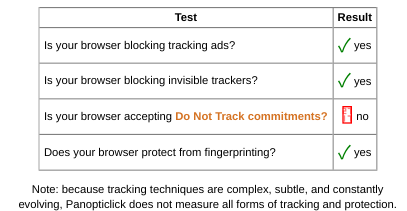
When doing the test of your browser, you will most likely see a message like this:

Screenshot from 2017-04-30 18:03:16

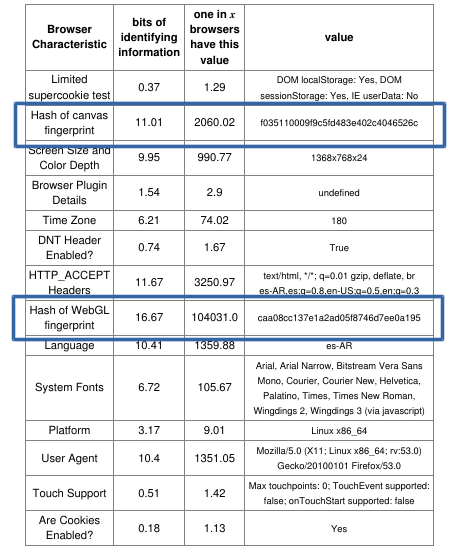
2) Browser tracking goes even deeper and deeper.  Even you get the binaries from Firefox already compiled, you will be surprised that on different computers the Browser produces very different responses, that together create a unique fingerprint.

Unique numbers obtained for the same computer but different versions of Firefox.

Firefox 52.0.2

Screenshot from 2017-04-30 18:13:42

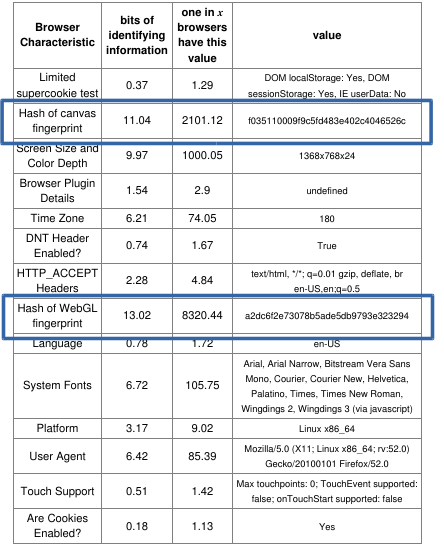
The identifiers that have more relevance are the Hashes of Canvas and WebGL.  For example, the identifier for WebGL says that one browser in 8320 has this ID but together with the other identifiers (not considering external data).


Firefox 53.0.0

Changing the version of Firefox keeps the same Canvas identifier (always on the same computer).

Screenshot from 2017-04-30 18:19:16

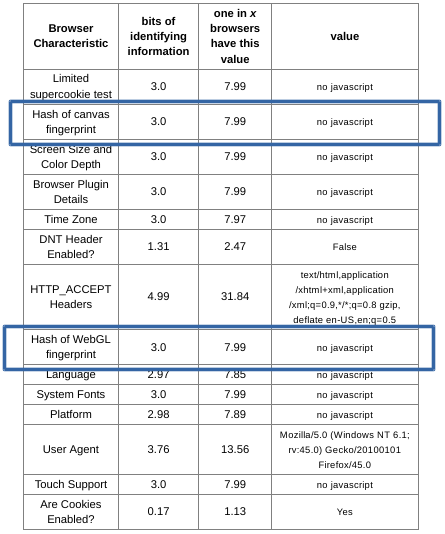
Is TOR Browser better protecting on this scenario ?

Yes, i said the magic word, oh yes, we are going to the deep web.  Before presenting the results i would like to say that Tor may not be the perfect solution.  But it is gaining popularity.  Be careful, because the only fact of using tor could create a fingerprint for your person:  for example, you are in a place full of people, and you are the only one wearing a mask, that would create a unique id for you.

This test looks better:

Screenshot from 2017-04-30 18:25:29

And the already known identifiers look better also.  I hope this is trustworthy.

Screenshot from 2017-04-30 22:06:33

Ok now we are at the end of this post.  I could not find one place that explains how those unique identifiers (or hashes) are created, at some places it says that it depends on the computer: memory, video driver and other things… true is that our team in Buenos Aires has tested different configurations: more or less RAM, more or less Video Memory, other video driver, but the hashes remained the same.

It would be interesting to test a different operating system: another kernel version, 32 bits instead of 64, redhat instead of debian.

Thanks to the Perl Mongers in Buenos Aires for helping in the analysis.

Protecting your data in the cloud

Hi, this time a post about privacy and some recommendations about protecting what is yours and nobody can take away: your privacy.  In a world where the technology has evolved in complexity that most do not understand how it works it is important to help people learn that they have civil rights and they should be protected.

One way to store private information is the cloud.  This is not the only way and this is probably not the best way, but i guess it is a good way.

We will create a storage to place there what ever you want, it could be passwords, receives, images.  We will use two methods to encrypt the data and one to obfuscate it, you can choose the steps, the order, the amount of passwords, that would make it unique and very hard for somebody to get it.

You will use LUKS, gpg and a perl oneliner.

LUKS is a specification of a ciphered disk.

GPG or GnuPG is a complete and free implementation of the OpenPGP standard as defined by RFC4880.

Protecting your data

  1. Create the LUKS disk.
fallocate -l 1G 4youreyesonly.disk
root@arsat:/home/walter# cryptsetup luksFormat 4youreyesonly.disk

WARNING!
========
This will overwrite data on 4youreyesonly.disk irrevocably.

Are you sure? (Type uppercase yes): YES
Enter passphrase:
Verify passphrase:

root@arsat:/home/walter# cryptsetup luksOpen 4youreyesonly.disk first
Enter passphrase for 4youreyesonly.disk:

root@arsat:/home/walter# mkfs.ext3 /dev/mapper/first
mke2fs 1.42.12 (29-Aug-2014)
Creating filesystem with 261632 4k blocks and 65408 inodes
Filesystem UUID: 6f1c79b7-f1d5-4e05-b821-ead9ad9afdd0
Superblock backups stored on blocks:
        32768, 98304, 163840, 229376

Allocating group tables: done
Writing inode tables: done
Creating journal (4096 blocks): done
Writing superblocks and filesystem accounting information: done

2) Store some data inside the disk

mount /dev/mapper/first /mnt/usb/
cd /mnt/usb
root@arsat:/mnt/usb# ls -ltr
total 20
drwx------ 2 root root 16384 Apr 30 00:28 lost+found
-rw-r--r-- 1 root root    47 Apr 30 00:29 notes

root@arsat:/mnt/usb# cat notes
Protect this data:

Cipher, backup, restore.

root@arsat:/mnt/usb#

3) Now close the LUKS disk.  Unmount and close it.

cd
umount /mnt/usb
cryptsetup luksClose first

4) In this step you will cipher the disk with gpg.  Look that after ciphering it you will have a new file with the “.gpg” extension.  Notice that it is smaller, that is because while ciphering it, given the CAST5 algorithm that gpg uses, it probably resumes the zeroes from the file.

gpg -c 4youreyesonly.disk
-rw-r--r--  1 root   root    1073741824 Apr 30 00:29 4youreyesonly.disk
-rw-r--r--  1 root   root      35226974 Apr 30 00:31 4youreyesonly.disk.gpg

5) Now you can flip the file to make it harder to be recognized.

perl -pe 'BEGIN{$/=\1} $_ = pack("C", unpack("C", $_) ^ 0xff)' < 4youreyesonly.disk.gpg > 4youreyesonly.disk.flipped

6) Validate that the files a different.

root@arsat:/home/walter# md5sum 4youreyesonly.disk.gpg
f1c2ae655f52b7f78b477a887847649a  4youreyesonly.disk.gpg

root@arsat:/home/walter# md5sum 4youreyesonly.disk.flipped
d4ce830d575094aa8e88f3409cb46c8d  4youreyesonly.disk.flipped

root@arsat:/home/walter# file 4youreyesonly.disk.gpg
4youreyesonly.disk.gpg: GPG symmetrically encrypted data (CAST5 cipher)
root@arsat:/home/walter# file 4youreyesonly.disk.flipped
4youreyesonly.disk.flipped: data

You can now probably upload the file “4youreyesonly.disk.flipped” to any public place that nobody will know nor the methods used,  the order and the passwords.

Recovering your data

Now the time has come to recover the data.

  1. Un flip the file
perl -pe 'BEGIN{$/=\1} $_ = pack("C", unpack("C", $_) ^ 0xff)' < 4youreyesonly.disk.flipped > 4youreyesonly.disk.original

2) Gpg decipher:

gpg -o 4youreyesonly.original -d 4youreyesonly.disk.original

3) Open it with LUKS:

cryptsetup luksOpen 4youreyesonly.original first

4) Finally open it.

mount /dev/mapper/first /mnt/usb
root@arsat:/home/walter# cat /mnt/usb/notes
Protect this data:

Cipher, backup, restore.

root@arsat:/home/walter# umount /mnt/usb
root@arsat:/home/walter# cryptsetup luksClose first

Ok and that should be all for now.  I hope you liked it and please keep spreading with your friends how to protect yourself from intrusion of anybody.


Some private browsing tips

In my previous post i recommended about two firefox plugins to truly surf through Internet whoes pages have social network embedded widgets that only report about our presense in those pages and if we are lucky, only that, but i also identifies us because the propagation of cookies.
In this post i will give some recommendations about how to stop Firefox from surfing the web without us knowing it.  The other day i was analyzing what happens in the background in the network with Firefox open, and i was worried for a minute or two because i saw connections going out of my computer but i was not surfing anything…  i had one page open, so i closed it incase that that page had some javascript with a loop doing some connections without me knowing…. but the connections kept being done.

Disclaimer: These steps may do produce undesiderable behavior in your browser, these are notes i have written for myself and am sharing to help anybody that could benefit from them.

How to stop Firefox from automatically making connections without my permission

1) Clean all the live bookmarks if any.
2) Disable auto update (Edit -> Preferences -> Update ->
Never check for updates (not recommended: security risk) 
and uncheck Update Search Engines)

3) Disable auto update for plugins (Tools -> AddOns -> Extensions
At the top of the tab, click the Tools for All Add-ons menu and uncheck Update Add-ons Automatically, then select Reset All Add-ons to Update Automatically.)

4) Anti-phishing list updating (Edit -> Preferences -> Security ->
Block reported web forgeries. and
Block reported attack sites)

5) Add-on blocklist updating, Add-on metadata updating, Link prefetching
In the location bar write: about:config and set:
extensions.blocklist.enabled -> false
extensions.getAddons.cache.enabled -> false
network.prefetch-next -> false